Overview
XY Pad, by Tech Audio, is an interactive control script that can map and manipulate plugin parameters across an XY Pad.
Prerequisites
- ReaPack, a package manager for REAPER
- ReaImGui API available via ReaPack
Installation
- Install ReaPack if you haven’t already
- Open REAPER and go to
Extensions>ReaPack>Manage repositories... - Add the Tech Audio repository URL:
https://github.com/TeamAudio/reascripts/raw/main/index.xml - Go to
Extensions>ReaPack>Browse packages... - Search for
XY Padand select it from the list - Click the
Installbutton to install the script and its dependencies - Once installed, you can find the script in the
Actionslist underTA_XY Pad
Main Scripts
XY Pad consists of a main control script, and 3 component scripts:
- TA_XY Pad.lua
- Main control script. Renders the
XY PadandMappingswindows
- Main control script. Renders the
- TA_XY Pad Set X.lua
- Links last touched plugin parameter to the X axis
- TA_XY Pad Set Y.lua
- Links last touched plugin parameter to the Y axis
- TA_XY Pad Full Reset.lua
- Deletes all saved mappings and resets
TA_XY Pad.luato an initial state
- Deletes all saved mappings and resets
UI Layout
XY Pad Window
This is where you control parameters you’ve mapped to the pad by clicking and dragging your cursor within the grid boundaries. Parameters mapped to the X axis will have their values determined based on a factor ranging between 0 on the left edge and 1 on the right. Parameters mapped to the Y axis work similarly, with 0 at the bottom edge and 1 at the top.
Each mapping’s response curve is drawn on the pad in the mapping’s color, so you can see at a glance how pad position translates into parameter values (see Shaping Parameter Response with Curves).
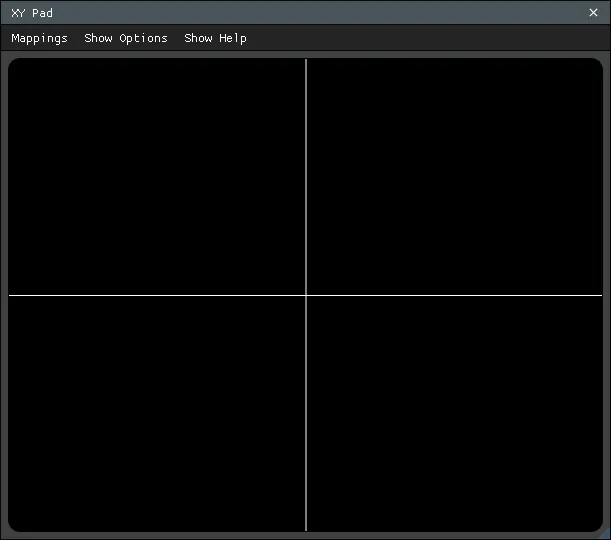
Main menu items
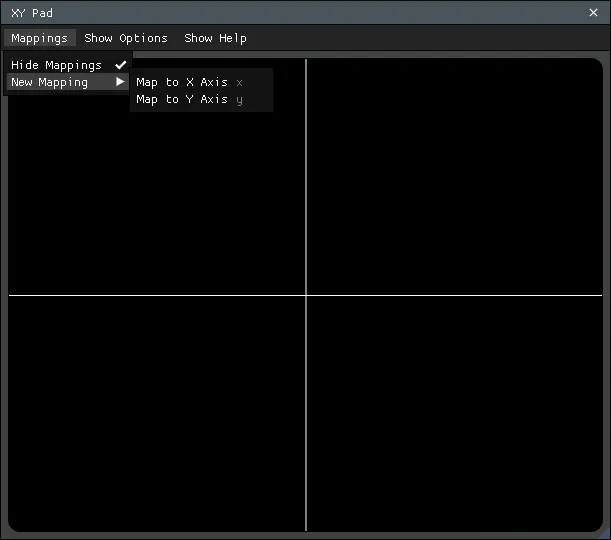
MappingsShow/Hide Mappingsopens theMappingswindowNew Mappingsubmenu items to map plugin parameters to the X or Y axis
Show/Hide Options- Opens and closes the
Optionswindow to change the colors, grid setup, and other appearance settings of XY Pad
- Opens and closes the
Show/Hide Help- Shows and hides the tutorial text that is shown on first startup
Mappings Window
Mappings are shown as a tree grouped by track, FX and parameter, with each mapped parameter’s controls laid out in columns. The window refreshes automatically when the project changes (tracks or FX added, removed or renamed).
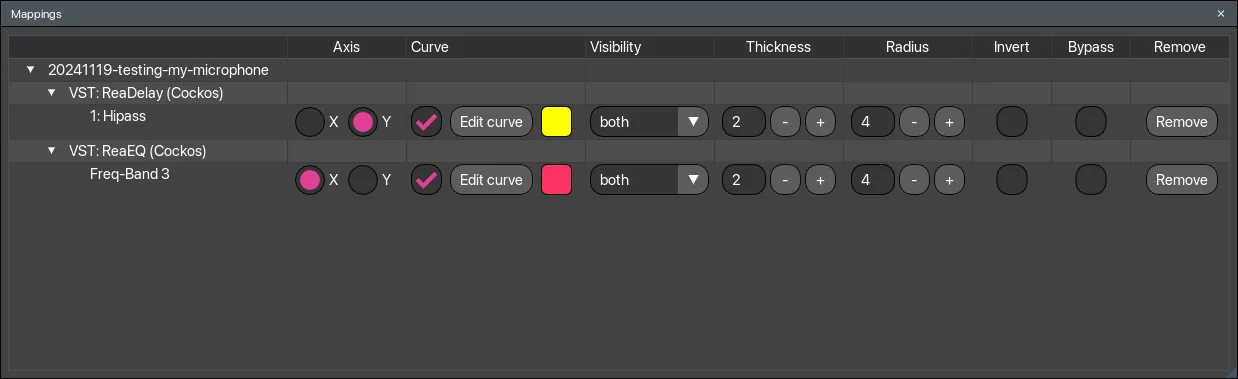
- Columns, per mapped parameter
Axis- Reassign the parameter to the X or Y axis in place; the mapping’s curve and settings are preserved
Curve- Toggle whether the response curve is applied (its shape is kept while disabled), enter curve edit mode (see Shaping Parameter Response with Curves), and set the curve’s color via the swatch
Visibility- Choose whether the curve’s segments and/or points are drawn on the pad
Thickness,Radius- Line thickness and point radius for the curve on the pad
Invert- Inverts the value XY Pad sends, after the response curve is applied
Bypass- Bypasses the plugin parameter from being affected by XY Pad
Remove- Removes the mapping
Options Window
Here, you can change aesthetic properties of XY Pad. Number of gridlines, colors, just about everything!
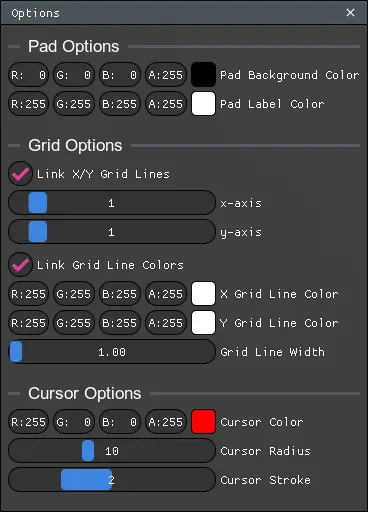
- Pad Options
- Change the pad background color and the pad’s lower-left corner label color
- Grid Options
- Change the number of horizontal and vertical gridlines that occupy the pad
Link X/Y Grid Lineschange values at the same time
- Change gridline colors
Link Grid Line Colors
- Change gridline width
- Change thickness of the gridlines
- Change the number of horizontal and vertical gridlines that occupy the pad
- Cursor Options
Cursor Color- Change the color of the circular cursor that shows when clicking and dragging on the pad
Cursor Radius- Change the size of the circular cursor
Cursor Stroke- Change the thickness of the circular cursor
- Curve Options
Transpose Y curve(per project)- When enabled (the default), Y-axis mapping curves are transposed on the pad so their input runs bottom-to-top, matching the axis they control
How to Use
Mapping Parameters
XY Pad allows you to map a parameter by running one of its accessory actions (TA_XY Pad Set X.lua and TA_XY Pad Set Y.lua) or by activating a training mode directly inside of the plugin.
If you’d like to map a global shortcut to assign parameters to the pad, use one of the accessory scripts:
- Click on the plugin parameter you’d like to assign to the pad.
- With the main TA_XY Pad.lua running, run either the TA_XY Pad Set X.lua or TA_XY Pad Set Y.lua action to map that parameter to the X or Y axis respectively.
If you’d prefer to do this from XY Pad directly, you can!
- Invoke the training mode from the main window by selecting New Mapping -> Map to X Axis or New Mapping -> Map to Y Axis from the Mappings menu. Keyboard shortcuts “x” and “y” are also available to trigger the same behavior.
- Click on the plugin parameter you’d like to assign to the pad.
You should see your mapped parameter appear in the Mappings window under the chosen axis.
Both modes leverage REAPER’s GetTouchedOrFocusedFX() ReaScript function to determine the last parameter that you interacted with. This can be a somewhat quirky experience in practice, for example if you’ve already mapped a parameter and attempt to map it again. XY Pad will do its best in training mode to describe any situation preventing a mapping based on this value, displaying messages like “No tracks in project”, “No FX in project” or “Touch an unmapped parameter to map it to the pad.”
Manipulate Parameters
- On the main
XY Padwindow, values (0, 0) is the bottom left corner, and (1, 1) is the top right corner - Clicking and dragging your mouse across the Pad will move the plugin parameters between the minimum-most value and maximum-most value for that particular plugin by default
- Each mapping’s response curve shapes how pad position translates into parameter values — see the next section
Shaping Parameter Response with Curves
Every mapping has an editable response curve that maps pad position (input) to parameter value (output). By default it is a straight line: pad position passes through unchanged.
Editing a curve:
- Click
Edit curveon a mapping in the Mappings window to edit its curve on the pad Right-clickanywhere on the pad to add a pointRight-click and draga point to move itAlt + Right-clicka point to remove it- The first and last points are pinned to the pad edges; drag them to limit the range of values the mapping produces
Related controls:
Use curvetoggles the curve on and off without discarding its shapeCurve visibility,Curve color,Curve thicknessandPoint radiuscontrol how the curve is drawn on the padInvertcheckbox flips the value XY Pad sends after the curve is applied, meaning (0, 0) is now the top-right corner, and (1, 1) is the bottom-left cornerBypasscheckbox switches on and off the manipulation of the plugin’s parameter by the XY Pad- For Y-axis mappings the curve is drawn transposed by default so its input runs bottom-to-top; this can be disabled per project with
Transpose Y curvein the Options window
Upgrading from XY Pad 1.0: the Max/Min sliders have been replaced by curve endpoints. Projects saved with custom bounds are migrated automatically — the mapping sounds exactly the same, and the old range is now visible and editable as the curve itself.